Julie's Venetian Courtesan

Who doesn't want to be a Dangerous Beauty?

Wednesday, March 30, 2005

Wish I Were a Yoga Master

Or mistress, I suppose.
Why?
Cuz last night I finished tacking my cartridge pleated skirt onto my makeshift waistband, and i can't get into it. Here is an amusing pic of me trying:

yoga
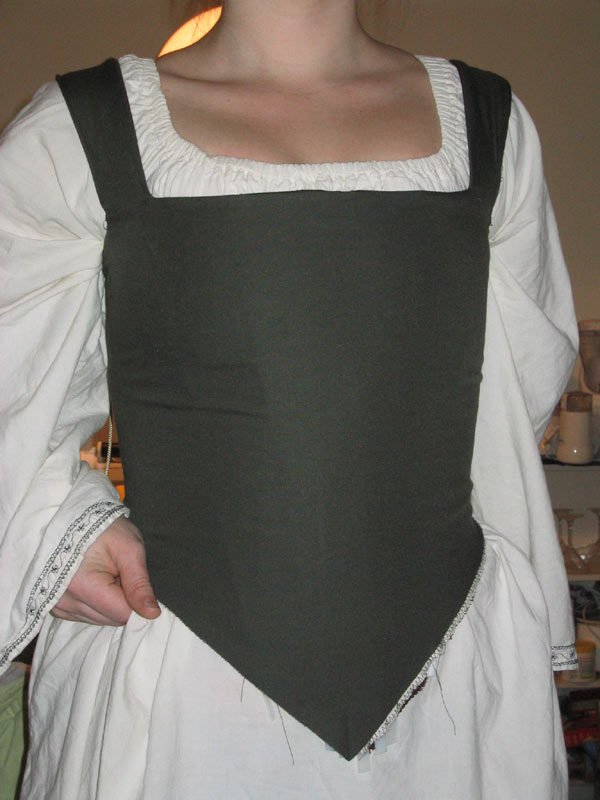
Since I can't yet model the skirt on my waist, hubby and I decided if I modeled like this i could be Van Helsing or Amadeus. Incidentally, this also gives a good idea of how much too long I made the skirt...Some major hem is required:
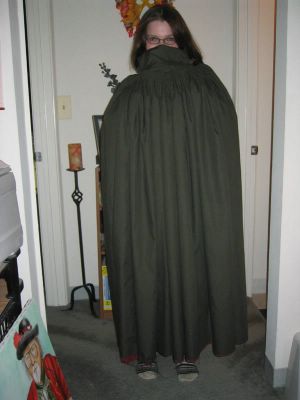
crazy skirt Posted by Hello

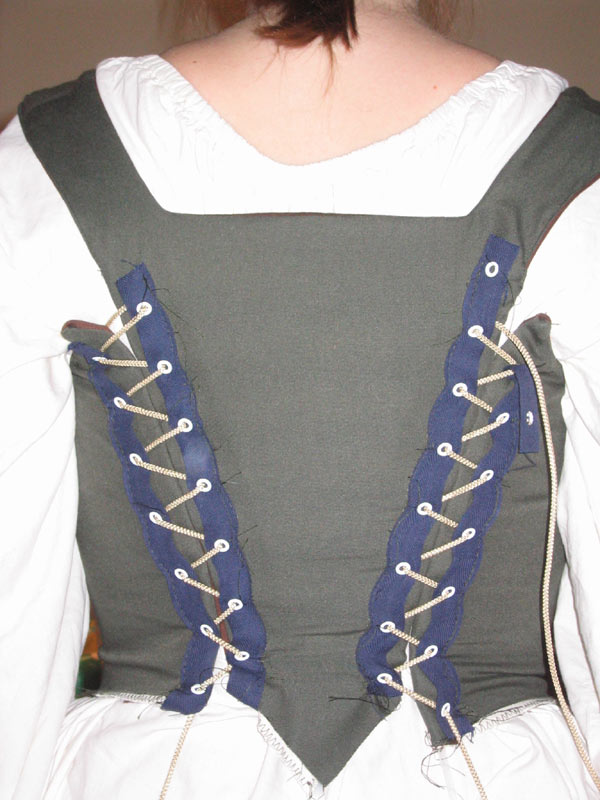
Of course, I knew I was gonna have to split the skirt to get into it for real wear. But I was hoping to be able to wriggle in and out for the practice dress so I wouldn't have to split the back sides and then repair them later and split the front when I alter the dress to front lacing.

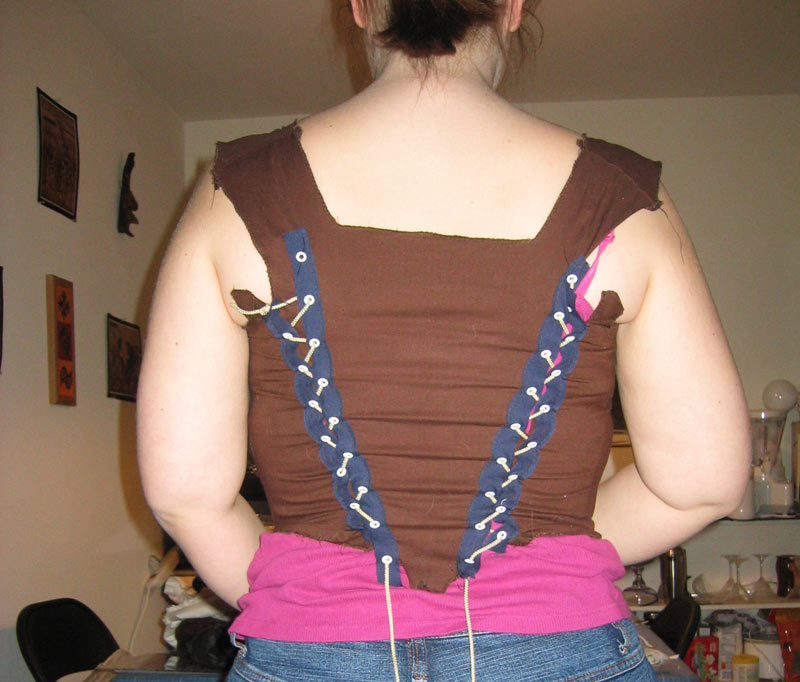
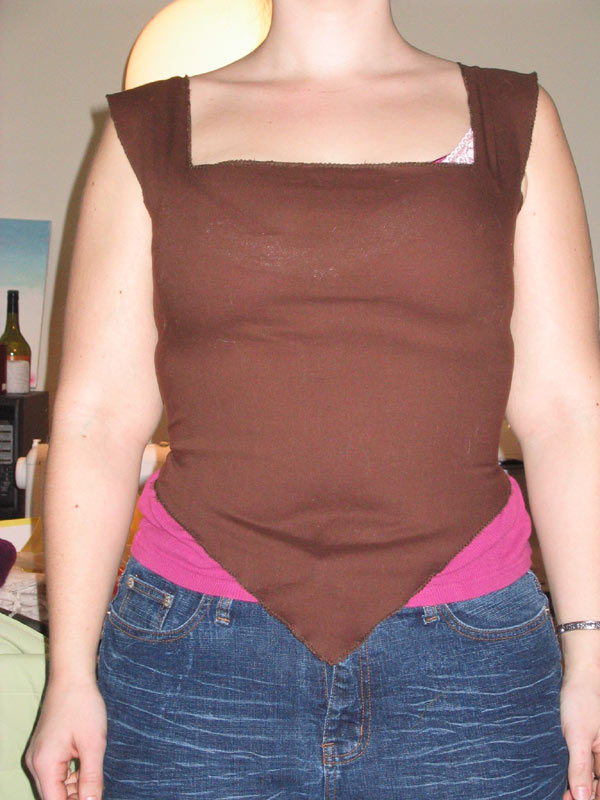
Beth has suggested a leap of faith where i assume the bodice fits. well, it certianly seems too.... and start the ladder laced alteration now to only have to split the skirt once. I'm quite tempted...


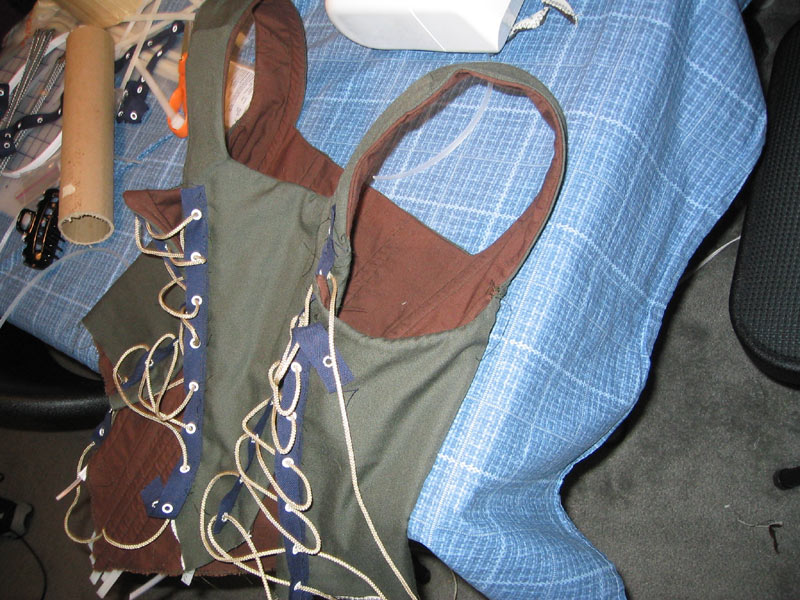
Here's a pic of my tacking the cartridge pleated skirt to the waistband. I did three tacking stitches per pleat. Right sides together...

cartridge tacking Posted by Hello

Final matter:

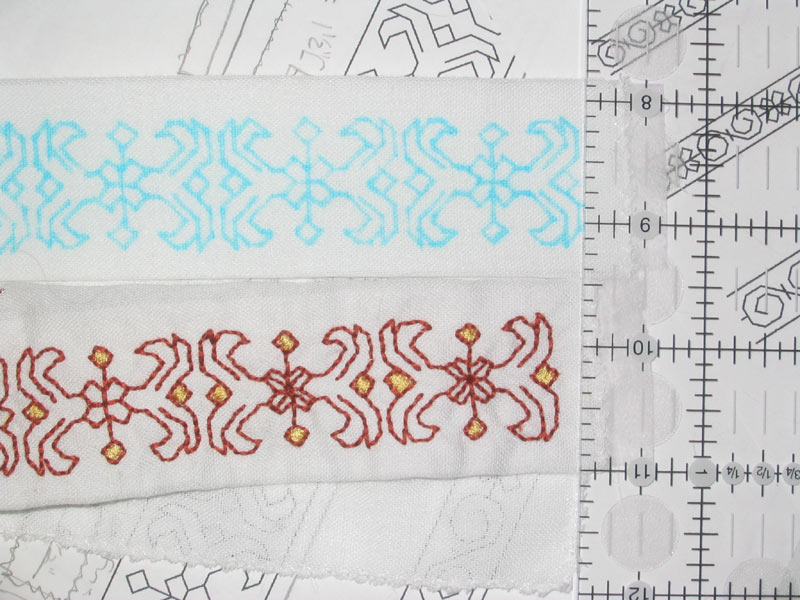
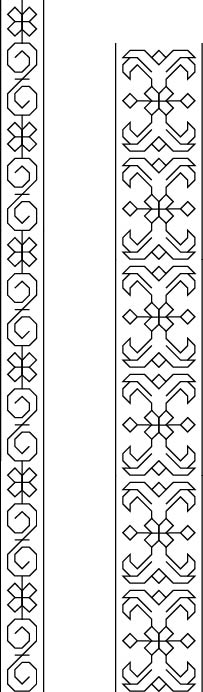
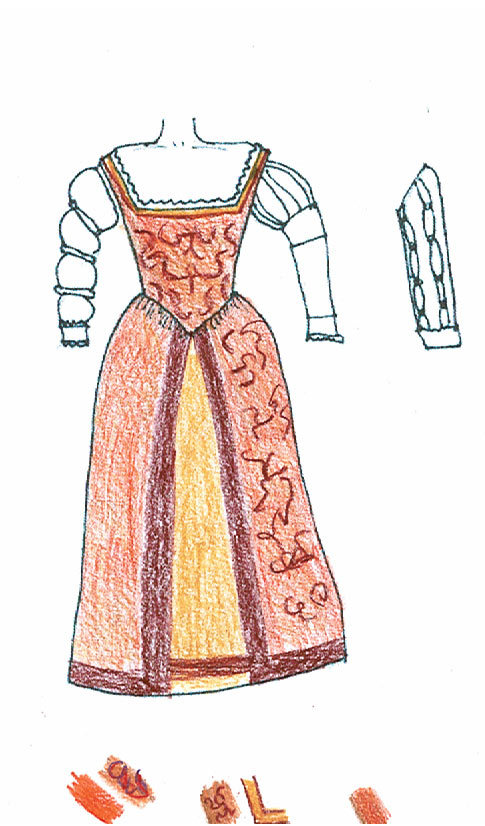
Beth, here are my latest blackwork designs. I did the design alteration I was thinking of on the flaming onions--this way you can pick between two. This pic also has a background grid--look at the zoomed pic for more detail. Please note, though, that the grid we drew it on was 20 square/inch, and the grid in this pic is 10. But it will still give you a good idea of scale. The 20 square/inch was too pixelated to see in pics.

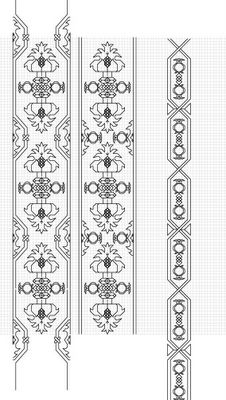
blackwork designs. Includes neckline idea, lemme know what you think.

Monday, March 28, 2005

Luting

A small tangent from costuming. But its Ren-related, so I think appropriate to post here. I have become enamoured with the idea of getting a lute and learning to play upon it. My dad and I started researching this weekend, and he's going to try to find out more from one of his friends that owns one. We're not sure if he plays yet, but if he does, all the better, as I'd have someone to ask questions. Teaching myself is fine, but knowing there is someone to go to when i'm stuck is better. ;-) Anyway, I shall not bore others with too much of my research, but it looks as if a 6-7 course lute is the way to go for the period (meaning 6-7 pairs of strings), and last night I started searching for lute/vocal music for purchasing.

I know, I know. A bit early to buy the music before the lute, right? Well....I actually found out how to tune myclassical guitar to lute tunings, and so could get a jump start if I want. Which I do. Now I just need to find my pesky guitar capo. I think it has resurfaced a few times since the move, but I've no idea where to look for it. I may be visiting the music store today.

If I get my way, this will be me: (maybe)

Detail of fresco from Realm of Venus

Oh, and if anyone reading this diary ( I know there are a few besides niter and beth) know anything about lutes, I would greatly appreciate helpful hints!

Blackwork By Design

This weekend was spent both working on my own blackwork and trying to design some for Beth. Graphic design hubby was of great help on the adobe graphy program he had, since its much easier to erase on that than it is on graph paper with a crappy pencil eraser (pencils can be hard to come by in this house). It also makes for a much nicer picture on my blog. teehee.

The following designs are all Beth possibilities. I took the idea of the pomegranates that she seemed to favor, then did one pomegranate design and then totally disregarded pomegranites to persue what I'm calling the flaming onion. Actually, it was supposed to be some sort of artichoke pomegranite hybrid, so it can also be called the artigranite, the pomechoke, and hubby calls it a flaming pineapple. Its clearly got identity issues... Speaking of which,Beth-- please lemme know if you'd rather purity in your pomegranates, rather than mutants thereof. I'm a radiation biologist and have a little thing for mutation.

Anyway, Beth, please look these over, decide if you like any of them, or elements thereof, would like me to tweak, or like me to try again ;-) I will not tell you which one I like best, but I can tell you that I am not 100% happy with any yet. Therefore, if you are not super fond of any, believe me, I understand and will go back the drawing board, or graph paper, or adobe or whatnot. Also, when we do come up with a wristy cuff you like I can work up a neckline deal using similar themes. I figure that'll save designing necklines for all these possibilities until we actually find one you'd like to work with.

These are all right around 2 inches. I'm sorry, I couldn't bring myself to do 3 inches cuz 2 inches looked huge to me. But if you want bigger, just tell me to supersize it. ;-)


hrm...I suppose I'll tell my inspirations. The twisty bit/frame on the two outer designs are from Dragonbear's Italian sampler, though it appeared there with acorns, and we modified it a bit. The pomegranite in the left most design is a not quite as stylish version of one found on Kateryn de Develyn's spanish sampler (its black on the sampler). I tried to do the super stylish one in this design, but it didn't fit well in the twisty background. Actually, I wouldn't mind using this pomegranite design plugged into something else, as I think its loverly. If you move your eyes to the right of that spanish sampler by kateryn, you find my inspiration for flaming onions in green.
The middle design combines flaming onions and an alternative pomegranite as seen on Blackwork archives. The left is obviously same background as first, but uses flaming onions instead of pomegranites. The thing I like about the flaming onion is the shape kinda mimics some of the Italian fabric prints.

Anyway, enough for now. Its bed time. Easter chocolate has kept me up past normal sleepiness, but if i don't sleep, work tomorrow will be torture. Of course, it'll probably be torture regardless...

Sunday, March 27, 2005

Blackwork

Pre-Easter at the in-laws provided much time for blackworking. Mostly cuz hubby and his brother were engrossed in video games. This was fine by me, however, as I got to listen to the game narrative and background music, which was conveniently somewhat period luting. The game was Bard's Tale, and I found it fitting to work on dress details during. ;-) I also got to stitch while my MIL knitted and we watched home decorating shows and ate chocolate. Oh, the decadence....

I am almost finished one of my wrist cuffs. I ended up picking a rusty brown embroidery? thread (I used 3 strands of the 6-strand stuff you usually use for cross-stitch). I cut a strip of iron-on interfacing for the cuff stability ( my camica fabric is really flimsy, and I think I needed more structure). The wrist bands are 1.5 inches wide. I drew the blackwork design on them with wash off fabric marker. Luckily, 1 layer of camica fabric and 1 of interfacing were fairly transparent, so this was simply a matter of tracing. Here's my progress so far. Its most certainly got that hand done look. But thats the point, right?

blackwork

As you can see, I decided to get "fancy". I filled in the diamonds with some yellow thread I had in my bag which happens to be the same yellow thread I used to do the edging on my camica neckline and sleeve bottoms. Why? Mostly cuz I only brought one wrist cuff for the weekend and I finished it more quickly than expected and wanted more busy work. I also thought the yellow would tie in with the edging and look nice. Period? I dunno. But I like it.

Then I finished the yellow and still had time to kill, so I decided to go back and add the middle lines in the x/flower bits. Luckily, we're back from in-laws and I've prepared my next cuff, so I won't be tempted to add more embellishment on it. I think its borderline "busy" already. hehe. The only thing they will get besides what you see above will be two straight lines on either side for a border. This will be conveniently placed over the sewing machine lines I'll get when I attach the cuffs to the sleeves...

Thursday, March 24, 2005

Whew!

Cartridge'd!!!

All three lines of stitching in, and I pulled them up to cinch it--couldn't resist seeing the effect. What neat little pleats they be!!!

Now I just need to figure out how to attach this massively heavy skirt to my bodice. According to most informative site I've read (Ren Tailor) you have to attach right sides of skirt and FINISHED bodice together. So I guess I have to finish the bodice boning/bottom first... I wonder if its possible to attach the skirt to lining and interlining only and then try to do a cleaner finish between the outer layer of bodice fabric and skirt? I may have to play around a bit. Also, I wanted to steal beth's ideal and do some utility loops around the bodice/skirt seam for attaching useful items--may i ask if there are any tips/tricks to this, dear?

I'm also seriously tempted to throw in a pocket or two. ;-)


Chuckle. I love this!

Wednesday, March 23, 2005

Progress...

...is slow. Still, I'm brushing up on my stand up comics today while I work on my 3 lines of running stitch for the cartidge pleated skirt. And it is rather relaxing to just sit on the couch and stitch.

I decided to line the skirt with the first fabric I bought for my courtesan gown (yes, i'm on my third choice now). Its a mauvey-red with purple floral crap. I figured I'd never find another use for it, and it actualy does make a decent lining. It adds a lot of weight, which hopefully means nice drape and making the practice more similar in weight to my real dress, so my practice is more applicable... Here's the fabric, gurgi loves to get in my way when i'm trying to lay massive amounts of fabric flat on my very limited floor space:

fabric--this is where gurgi plopped himself right on the bit of fabric I was trying to measure and mark for pleat stitches. Silly pup--his evil eyes are showing his true colors.

Detail (for me to remember) of the skirt:
1) 3 panels, 58" wide at 53 inches long (plenty of lengh since I dont know how much extra I need for cartridge pleating "poof" and foldover.) I figure based on how much I have to hem this skirt I will know how long to make my real one to conserve as much fabric as possible...
2) lining and dress fabric are sewn together right sides together at the top/waistband with a 2 1/4" hem. When turned right sides out, this will mean the skirt will be 4 layers thick in the area getting cartridge pleated, and thus should make for a fuller gather and more body.

hem--sorry, crappy pic
3) I cut dips out of the top of the waistline that (hopefully) are in rough proportion to where my dips fall naturally in the bodice. The total skirt is 170" circumfrence, and the waist is 38". I worked the dips like this:

skirt dips--hopefully this math works for me, or there will be an ungodly amount of seam ripping. Love my sketch, dont' you? ;-) Its here so I can't lose it.

In other news, I have drafted some blackwork patterns I think I will use on my camicas. I was just gonna use other people's stuff, but then i decided to be creative. ;-) Hell, I've got time....
The skinny swirly one is for the neckline, and the more ornate one is for the wrists. The wrist one is loosely based on an example of Italian blackwork I found on DragonBear.
I may tweak a bit more, but I'm sorta fond of these:

blackwork

Thursday, March 17, 2005

No survivor? No CSI? I'll sew, then.

Yes, all my fave tv shows were moved or ignored for NCAA craziness. Thus my evening was unobstructed sewing. What's funny is how little I actually got done considering how long I had...I was retardedly slow when it came to pinning (and sewing, too, actually) this evening.

Anyway, I cut the outerdress bodice fabric, and finally figured out how to sew the blasted thing together with right sides together and turning inside out without getting hopelessly twisted on itself. Long story. There was a lot of seam ripping involved....

Regardless, here is the bodice as it stands now:

front Posted by Hello

I like the shape a lot. This pic is sans fancy corset, so I'd say the boning in the bodice alone is pretty sturdy if i wanna cut back on some layers. I used the cable ties for boning in all my channels except for the boning that goes over the shoulder. For that I used regular old poly boning from Joanns, since I could get that in longer lengths than cable ties. My concern with the bodice "as-is" is that you can see the boning through the outer layer, so I may need to add a little padding layer. Sigh, I was hoping to avoid additional layers. This could be avoided with creative trim, though, as Beth suggested. I will think on it more. Oh yes, and I'm hoping those side wrinkles go away with skirt weight. If not, I will have ot be creative with ridding myself of them.

Here is the back as is:

back Posted by Hello

You can see the butt point. its more pronounced than in pics from yesterday, but I still think it could be a bit more so. For the practice dress, I'm happy with this and won't change it. But on the real deal, my plan is to take the side seams further to the sides as they approach the bottom so that the triangle won't be so pinched, and to perhaps lengthen the triangle if the widening doesn't make me happy enough. The two sides on the waist are a bit uneven, but I think that will correct itself when I actually measure as to where I'm sewing the eyelets. This placement was rather cursory.

Also note: These are still my impermanent lacing strips, as I'm not ready to actually put in eyelets. I am still thinking of changing this practice dress to be a ladder laced front, so that would mean I just sew the back seams. So it is likely I will never put real eyelets in this particular model...

Oh, and just cuz i'm tickled with this idea:

straps Posted by Hello

This is the result of taking boning up the front sides, through the shoulder straps and down the back. This is just wondeful, and I will definitely be doing this for the real dress. These straps are sturdy, and you can see that they hold their shape very well. They will NOT be slipping of my shoulders, which is great. And added bonus: they push the bosoms in from the sides to (hopefully) eliminate side cleavage while enhancing the sexy little bit in the middle. Italian Rennaissance cleavage enhancement.

Wednesday, March 16, 2005

Bodice Bruhaha

Tonight I thought it'd be good to work up my bodice for my practice dress.

I had my lining cut out from yesterday, so I figured I'd do a "final" fitting with it before proceeding. To this end, I sewed the shoulder seams together, basted some eyelet ribbon on (an ingenious find from our fabric store weekend ) and roughly laced it to make sure it fit. It seems workable to me:

back--the wrinkles will go away when there is boning on the lacing edges--ick--pardon the underarm back fat. Hope that doesn't keep happening. The lining is not actually crooked either, that is simply an artifact of the way i crookedly sewed on the lacing strips--hey, I said it was rough..... Contrary to what it looks like, there is a back point, but its kinda lost in the wrinkling--hope that gets better. If the point is still too small (despite lengthing it from my original pattern), I will just make it more pronounced on the "real" dress.

front --good view of the general shape. The shape will no doubt be smoother with boning in and corset under--also more conical(less boob bump). This is a great start, I think. Don't worry, the neckline will be lower once the whole dress is together--I've got some seam allowance still on top there. I like cleavage. ;-) The waistline will come up to a more flattering level when the seams go in, too.

Since the lining was workable, I took to cutting out the interlayer so I could make the boning channels. The interlayer is white denim (leftover from my corset), and was cut with the same bodice pattern. I clean finished the edges to prevent fraying, and pinned my lining and interlayer together. Then I took my ruler to draw my boning lines. These are where I decided to put them--notice, I am gonna try taking the boning up over the shoulders for wide-set strap stability:


boning placement

I went out tonight and bought zipties for cheaper boning. I got some mighty 24 inch long ones, and I think they will work quite nicely (thank you Beth!). Now I just need to find a tool I'm willing to dull cutting them to the right sizes.

Overall, I'm happy with tonight progress. Tomorrow, perhaps I will get as far as cutting out the outer layer of bodice and starting the assembly process. How exciting.

Tuesday, March 15, 2005

Practice Dress

Wow. I have just now realized that my blog up to this point has basically been a whole lotta build up and research but not much dress making. Yes, I've sewn some underoos. But now, faced with the prospect of an actual *gasp* dress, I'm quite excited. ;-)

I am starting on my practice dress. The plan is to have the pattern in good working order before I cut up my more expensive fabric. The practice dress will be an army green type color (the plain backside of a lightly patterned cotton/rayon? type fabric I have just sitting around). If I decide to keep it around to use on dress down renfest days, I will be trimming it with some brown scrap fabric I have (using this for the lining, too). Also, once I'm confident that my closed front pattern is in good working order, I may alter the green practice dress (no doubt at a later date) to be a front ladder lacing style, since I think that would be fun to have in my collection.

practice fabric colors. very neutral/natural

Professionally fitted (compliments of beth) pattern in hand, I started cutting out the bodice lining:

lining
Then I realized that it has been since highschool (just about 9 years ago) since I have made any sort of bodice. And when I made that one I had a pattern with directions for dummies, and for all the directions I was too dumb for, my grandma helped. Thus I am not exactly sure how to proceed (how embarrassing). So, I started doing some dress diary research and heavy thinking (takes me a while). I think I am now getting an idea of how I'll actually work the sewing, since I wanna include some boning I will have a lining, then an interlayer, so the boning will go between lining and interlayer. Then I'll sew the actually dress outer fabric on top of all that hubbub. What I'm hoping is that you will not clearly see the boning through the outer layer. If I can, then I'll most likely have to add another layer. But I really would like to keep the layers to a minimum for hot days.

Also, I was struck by an idea I saw on the Semptress's site. In her construction of a pair of bodies, she takes boning all the way up the straps and over the shoulder straight down the back. I realize this may be unorthodox for a dress bodice (rather than an underdress corset deal like she was making), but I really kinda think that doing this will minimize strap slippage. I've read a few dress diary's where strap slippage was an issue, especially since the Venetians were fond of wide-set straps, and I really do wanna presesrve this style but not have to worry about my dress falling off. ;-) I think a cheap poly boning, rigilene, or even zipties (which I am eager to try after seeing beth's corset) are all flexible enough to work for this and still provide a decent structure. I also think having straps with just a little struture will help push my...ahem...assets in, and minimize side-cleavage, which is not exactly the look i'm going for.

Oooh, and brilliant Niter suggested quite a fun litle project to entertain me. After I cut out the bodice lining, she told me to take the negative and put it on my real fabric to get a sense of pattern placement. Of course, it took her a few moments to explain to retarded little me what the "negative pattern" meant--I was stupid and flustered last night. Regardless, it was a wonderous idea, and here is what I came up with-pardon the not exactly straight laying brown, but at least it gives an idea. Loving it.

front-- i think this layout is perfect.

back--still considering this layout, but I kinda like the way the pattern is here, i think i may move the two meeting lines on the design a bit further up the back, though.

Sunday, March 13, 2005

FunFilled Weekend

Greetings to my accomplices--I hope your drive home has been a smooth and enjoyable one--glad you're willing to drive so far for a visit! Oh, and sorry I forgot to give you your return trip chocolates (though that was suspiciously convenient, eh?). I think that means that the next time I come to visit you, I will have to make up for it by bringing you copious chocolates. Thank you again for all the wonderful gifts! I felt like it was Christmas. ;-) And Niter, glad I could unload my velvet upon you. hehe

For those of you not my accomplices, the three of us spent a very relaxing and yet fabric/trim- filled weekend together. We decided (rather at the last minute) to have a weekend of girliness, fabric sales, good food and just a *little* wine and karaoke thrown in for giggles. It was wonderful to finally be able to talk about design concepts in person (and with fabric swatches on hand, I might add). Sipping some great gourmet teas (from adagio.com--see button on left to get a coupon--shameless plug), and munching on strawberries and fancy pants chocolates seemed to complete the decadence of a weekend already dominated by decadent fabrics from various local vendors. The weekend got me psyched to sew again, which I'd been kinda putting off recently. Now I'm definitely feeling more motivated.

I was also extremely happy that the fabric store sales I promised did not leave my dear accomplices empty handed...that would have been not quite as fun, though I think we would've enjoyed ourselves with or without fabric purchases. After all, just looking and getting ideas is entertaining... But purchases are damn satisfying. Chuckle.

My personal "big" find was the fabric that I will slice up to make guard/trim for my dress. It is a dark maroony red wool--very soft and seems pretty fine (or so I think, don't know much about wool, actually). I got just under 2 yards of it (remnant), and I'm certain I will make that amount work for my purposes. Now that I have the main dress fabric and the trim, I will start considering the fabric to make my underskirt--currently I'm leaning towards trying a peachy golden hue, but I've not actually seen the three together, so that could change. Below is a pic of my orange dress fabric and red guard material. Notice how dear, long-haired Gurgi had to sit on the fur-attracting wool ASAP. I also bought two little fabric swatches that I'm considering for use in making flag fans or pursey-pouches. I don't really know their fate yet, but I liked em, and now they're mine. ;-)


dark red wool trim

A big bonus of our time together(for me at least) was that I had my bodice roughdraft pattern pinned up to fit me properly, and now I'm drafting the "final" pattern--thank you so much for your patience in helping me out with that, girls--especially Beth!! Hopefully, this means that in the next few days I will get a move on cutting out some bodice bits for my practice dress, and perhaps even *gasp* do some sewing!
Here is my pattern. I altered my corset pattern to get the general shape size, and experimented with adding the straps/back side lacing until I came up with something reasonable. Then dear friends helped me make it actually fit. Also, I love leftover christmas wrapping paper for pattern drafting. hehe

Sunday, March 06, 2005

Trim Color Clarification

Ah, for my accomplices. I know its hard to visualize my color choices from my drawings, especially on internet/wacky computer colors. This should give a better idea.

Here is what it would be like in the first sketch--my fabric with bold redhuedpurple trim. I think this looks very rich and sumptuous:


This is what I had in mind for the second sketch--orange velvet trim, but with a band of the purple:


And just for shits and giggles: what it would be like if the purple weren't there at all (less rich in color palette, i think). I am fairly certain i wouldn't go for this:

Saturday, March 05, 2005

Me, the Ex-Commitment Phobe

Yes, I admit it. I have been fabric commitment-phobic for the past few nights. Sad to admit, but fabric anxiety has caused mild insomnia and much anxiety during the wakeful hours. Hell, I even dreamed of fabric...

But today I did it. I bought it. And there is no turning back, cuz this store doesn't accept returns under 10 yards. And seeing as there were only 5.5 yrds to be had, I'm well under their return policy limit. I am stuck with it. And I love it. I have looked at, oh, 8 diferent fabric stores (but who's counting) in the last 4 days. And not a single fabric I saw that could hold a candle to this one was less than 30 bucks a yard (often much higher). So, despite spending more than I wanted (I still refuse to admit my splurge--believe me that it was nowhere near 30 bucks a yard), I got the best fabric for the cheapest I could find while still being thrilled with my fabric. Best compromise I could make really.

So, here it is:

Above, in sunlight, or natural light, I suppose...


With the camera flash on. Brings out the bronzy/cinnamon/browness.

I am somewhat concerned with the amout of yardage I have--5.5 yards (nice man only charged me for 5). I would rather have 6-7 to account for pattern matching and give a fuller skirt (hell, I had 8 of the velvet). But I know that if I'm careful, I can make this work. I also have a few tricks up my sleeve for fabric conservation--large swath of complimentary fabric along the bottom to lessen the yardage towards lenght for the skirts, and similar large swaths up the sides of the split skirt. I am also considering sleeves in predominantly or all complimentary fabric instead of the pricey stuff, if necesary. Or, I figure strip sleeves can easily be done using scraps from cutting if i'm careful.

Now for the fun part! Since I have new fabric, I get to come up with new design concepts. This means I get to break out the expensive colored pencils from my college artclass, which I always find fun.


I made up these two sketches:
I think I am more fond of the left one, as the deep reddishpurple seems more sultry and courtesan like to me (for more correct colors see 4th pic in previous post--middle purply red on my orange swatch). If I used this combo, I'd try to find a peachy underskirt fabic similar in color to the background of the dress fabric.

The one on the right I made with the peach/orange velvet in mind (4th pic previous post, top peachy velvet) for the bands on the bottom and sides of the skirt. While I like the idea it seems less impactful than the deep red-purple (at least in the sketches).


And just because it was cute that he helped: here is what adam would do (I'm considering it)--make the bottom/side skirt swaths match the dark detail of the dress fabric and do a gold underskirt. I'm clearly a better quality color-er, dont you think? (Not true really, as he was an art major, but he just didn't spend much time on this.) my concner with this is that it'd be harder to match the dress color than to just intentionally buy something different (like the purple). I'm afraid if I try to match and fail it will look as such.

adamsketch Posted by Hello

Thursday, March 03, 2005

Fabric Craziness

Its official. I've gone fabric nutters! Let me bring you all up to speed. I have recently been not up to sewing my dress. Why? Well, I think its partly because I'm not sufficiently excited about my fabric (also cuz I've been busy, but you know...). So I've arranged a mutually beneficial fabric swap with an accomplice, and I've been questing for the "perfect" fabric...

Though the red velvet is lush I have never quite gotten over the fact that its not the color I wanted (the one it was in the store vs the one it is in sunlight and in normal houselighting). But I've also noticed courtesan-accomplice-friend looking up fabrics suspiciously similar to my velvet. Yes, slightly different shades of red but similar. Why? Because she has secretly coveted my fabric and I've known it all along... ;-) So I've decided, why have two similar dresses in a closeknit group of three when we could have 3 spectacularly different ones? You see, this situation gives me the perfect "out" from my fabric. I sell velvet to accomplice, and she is happy. I buy fabic I like better, and I am happier. Plus we get the benefit of all looking unique in our courtesan threesome.

So today I went shopping. I didn't buy anything. But I had fun badgering sales people for swatches. There is one store left to explore for Saturday, but here are my current contenders:


Front sides of all. that orangy one is really not that bright orange, but the flash reflected off it funny. Love the orange, its my fave--but also the priciest (and i am worried that the store doesn't have enough yardage--they informed me its the last of the stock). I put the orange on hold and will call them tomorrow to have 'em measure exactly how much they have--guy at the counter estimated 5-6. I think I can eek out a dress with 6 yards, less if i must, but really I don't wanna go much lower than 5.5. Cartidge pleating takes a bit, afterall... (the soup can is for online color assessment--stole the idea off ebay).


In the sunlight--this is more the "true" color of the orange fabric, except that the burgundy on it is lost in this pic, and in person its more like the first pic. So, combine the orange from this pic and the red on it in the first and you've got the fabric I'm currently lusting after...


Above are the backsides of all the fabrics (just as a point of interest) and some trim options--I'm liking the purple and orange idea right now. Sounds weird, but I really think it could work if done correctly. Niter--Don't you DARE say its hokie colors. You'll ruin my whole dress for me. I'll cry. I swear I'll cry.


frontsides and trim


orange and burgundy close--again, its not really that orange. I love the orange cuz its like a cut velvet. Very period. The background is like a dupioni silk look in terra cotta, and the burgundy is raised fuzzy velvet.


Here's the multicolored one up close. I love this color combo, and it would make the purple/orange trim options work quite well. The problem is that there are only 5 yards. Which makes it kinda last resort--its on hold just in case. I'd also like to mention that this one's woven design seems the least authentically period of the three.


Here's the burgundy/gold one up close. I am quite fond of it. They had 41 yards at the store, so yardage certainly won't be an issue. This is my surefire backup if the orange is too little yardage and I don't find anything better come my last fabric store foray on saturday. The slashy design in the burgundy background seems a little unperiod, but its subtle, and I still think this fabric could work spectacularly. The full print on it is gorgeously period--you can't assess its splendor from a small swatch.

Wish me luck on Saturday. To Rockville to visit the TWO STORY fabric store. I'm excited. Its supposedly huge. I've never been.