One Down. Mostly.
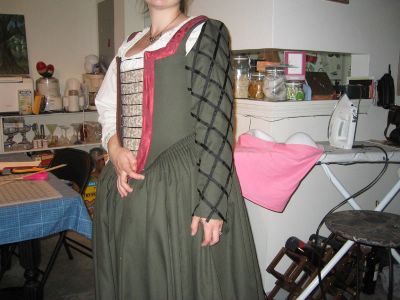
Tonight I worked on the lattice for my left sleeve. Honestly, once I got into it, the process wasn't that hard, and it only took a couple of hours. One nights work/sleeve is bearable, i think. And I'm very pleased with the result:

I will have to attach ribbons and whatnot to tie the sleeves on (right now its merely pinned). And i need to hem the wrist part, but that also will wait until i've got it tied on so i know the length better.
Note below, that my grids do not line up perfectly along the inside of my arm seam. I am far to lazy to do THAT much math. Just be happy the lines are straight, niter!
I also stole the sleeve opening idea from Beth, and tacked the sleeves together along this seam with pearls down the length. This is for my camica to poof through. This is my old camica, so there's not nearly as much fabric to pull through. I expect this look to get better when I finally finish gathering and butting cuffs/neckline on my camica.

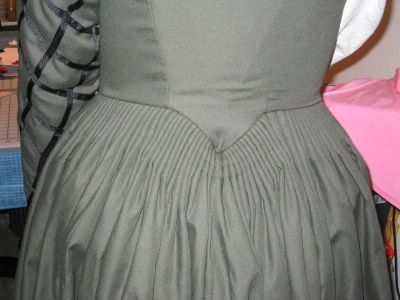
And for buttpucker giggles. A better quality pic of what my buttpucker is doing now. Still there, still annoying, but no longer poking my arse, and I'm at a loss to fix it. I honestly believe its a design flaw. My point is so sudden in the back that I think it makes too much stress. On my next dress, i will make the point slope much more gradual (a la Beth's dress), and I really do think that will fix the problem. This was supposed to be a learning experience, afterall....

buttpucker

I will have to attach ribbons and whatnot to tie the sleeves on (right now its merely pinned). And i need to hem the wrist part, but that also will wait until i've got it tied on so i know the length better.
Note below, that my grids do not line up perfectly along the inside of my arm seam. I am far to lazy to do THAT much math. Just be happy the lines are straight, niter!
I also stole the sleeve opening idea from Beth, and tacked the sleeves together along this seam with pearls down the length. This is for my camica to poof through. This is my old camica, so there's not nearly as much fabric to pull through. I expect this look to get better when I finally finish gathering and butting cuffs/neckline on my camica.

And for buttpucker giggles. A better quality pic of what my buttpucker is doing now. Still there, still annoying, but no longer poking my arse, and I'm at a loss to fix it. I honestly believe its a design flaw. My point is so sudden in the back that I think it makes too much stress. On my next dress, i will make the point slope much more gradual (a la Beth's dress), and I really do think that will fix the problem. This was supposed to be a learning experience, afterall....

buttpucker


3 Comments:
That sleeve is SO cool. I love it! I want to steal the idea someday.
The buttpucker is not nearly so puckery as I'd imagined. I don't think it's terribly noticeable anymore. And I agree with your assessment....less steeply sloped point next time.
Eeep, you're getting close!!!
Hi, I've enjoyed reading your blog--all in one night. Anyway, you might consider running a metal bone down the center back of your bodice, as this would probably get rid of the "butt pucker" problem. Your corset ends too soon on the back, and so the bodice is curling all funky-like. Solution: add stability where your corset is lacking. This, in combination with a more gradual point will probably solve the unsightly problem.
Tiamatorin--
Thanks for your suggestions! Its so nice to get input from people. You read a LOT in one night! I know, cuz I babble, and this diary has become pretty long. hehe. Thanks for dropping by!
I hadn't thought of your boning suggestion. On my next dress, I'm defnitely adding more boning down the back (there is a bit in this one, but clearly its not carrying the whole load--i may just change the angles of the boning and see if that makes a difference). And I'm most definitely widening the back point to alleivate puckering.
Sigh, the infamous butt-pucker.
Hope you keep reading, I think this next month should be action-packed!
Post a Comment
<< Home